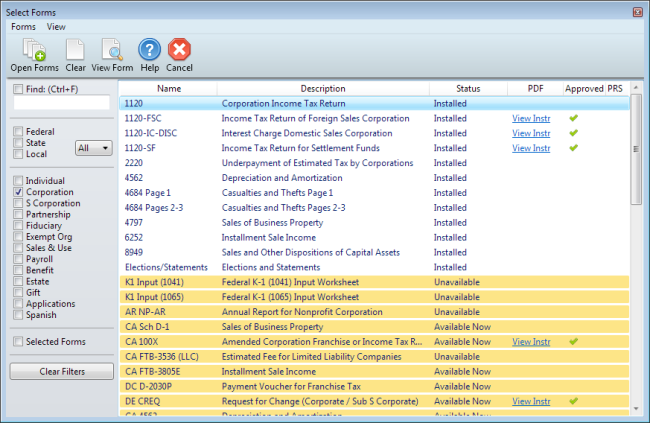
Select Forms Dialog Box
The Select Forms dialog box allows you to choose the forms you want to add to your return. The Filter Pane (left) helps you narrow the form list for easier form selection.
To access the Select Forms dialog box, do one of the following while in the Return Manager:
- Click New on the toolbar.
- Click the Returns menu; then, select New Return.
- Press Ctrl+N.

Select Forms dialog box
From an open return, do one of the following:
- Click the Add Forms button on the toolbar.
- Click the Forms menu; then, select Add New Forms.
- Press Ctrl+F.
The Select Forms dialog box appears.
Status Column (Form Statuses)
The Status column shows the availability of the forms:
- Installed – The form is installed on your computer and will load when you open the form.
- Update Available – The form is installed on your computer, but an updated version is available. When you select it and click Open Forms, the updated form will be downloaded and it will open.
- Available Now – The form is not yet installed on your computer. When you select it and click Open Forms, the form will be downloaded and will open. These will be highlighted in dark yellow.
- Unavailable – The form is not yet available in ATX. These will be highlighted in dark yellow.
- Customized – The Master Form has been customized. See Customizing Master Forms.
View Government Instructions
The View Instr link under the PDF column opens a PDF version of the government instructions for the corresponding form. See Government Instructions.
Approved
The Approved column provides a visual indicator for agency approved forms. When a form receives approval ATX displays a green check-mark indicating the form approval from the agency.
Select Form filters
Select Forms allows you to filter the form list in several ways:
- Find: (Ctrl+F) field: Use the Find field to enter search parameters.
- Federal, State or Local check boxes: Choose one, two, or all three (if selecting State and you would like all states, select All from the drop-down list.)
- Form type check boxes: Check one or more form types, such as Individual, Corporation, or Fiduciary.
- Selected Forms check box: Check the Selected Forms check box if you've highlighted specific returns in the list. Only the highlighted forms will appear in view.
- Clear Filters button: Check this box to clear the filters and to display a list of every form in the system.
Menus and Buttons
Form menus, menu items and buttons are detailed in the table below.
Menu | Menu Item | Description | Button |
|---|---|---|---|
Forms | Open Selected Forms (Ctrl+O) | Opens all highlighted forms. | Open Forms |
| Clear All Form Selections | Clears any selections in the list of forms. | Clear |
| Cancel | Closes the Select Forms dialog box. | Cancel |
View | View Last Selected Form | Opens the last form selected in a read-only window to determine if it is the desired form. | View Form |
| Choose State | Filters forms for the state selected. |
|
Government Instructions | Opens the PDF instructions for the current form, if available. | F3 |
See Also: